In this article we will explore how to deploy an application through the IBM Cloud Platform, by means of Red Hat OpenShift.
There are now far easier ways to deploy your product than having to do it all on your own as you did in the old days. The distance between code and production has finally shrunk.
Let’s cook a hamburger
There are more similarities between cooking and software development than one might think.
You are hungry and want to make yourself a hamburger. You go to the grocery store and buy bread, meat, onion, cheddar, bacon, mayonnaise… You return home and you’re all set to start when you suddenly realize you have no potatoes for your french fries.
You have to go out again to buy a bag of potatoes, and a bottle of peanut oil. By the time you’re home again, you’re twice as hungry.
Now you can start cooking. But cooking is something you don’t do very often and before you know it, the kitchen is in a mess. Everything smells of fried oil, and the stove is covered in stains.
Your hands are dirty and sticky after preparing the meat and there are bits of vegetables all over the kitchen counter, but you are far from finished. You still have to cook your hamburger, but first you want the bacon to be nice and crispy and the onion brown and soft. There’s a lot of smoke in the kitchen!
Finally, you can cook the hamburger. Even more smoke in the kitchen…
By now, you are so fed up that you’ve almost forgotten how hungry you are. All you can think of is the stench in the kitchen and on your clothes. Even worse – you’ve spent two hours of your time on this, and you are probably going to spend another hour cleaning up all the mess! It is disheartening.
You deserve a beer, you think. Oh no, you forgot to buy beer!
If you think about it, your real goal was not to cook. It was to eat a hamburger. Next time you want one, you might decide it’s better go to a fast-food restaurant, place your order, choose the sauces you like and the drink you prefer – you might even get a special offer for the menu of the day with your fries for free!
Hassle-free deployment with IBM Cloud Platform
The same happens with programming; take a web application as an example.
You have created an application, the code looks perfect. It is well-commented, indented and verified. Your expectations are high and you can’t wait for the users to use it! You’re ready to deploy your system when you suddenly realize that, well, you don’t have a system…
Yes, you have the code, but the system is still far from being available. You will need to get the machines (or VMs), then install the operating system (or SDK), and the firewall. You will also have to configure ports and networking, create a VPN for maintenance, or have access to local data.
That’s not all, of course. You will have to harmonize the libraries and, in all likelihood, use many open-source tools that must be able to talk to each other and be aligned: Helm charts, Kubernetes for your containers, monitoring and log systems, image catalogues…
And then, that niggling thought at the back of your brain that you’ve forgotten something – you always do – makes its presence felt.
You are not cooking now, you are developing, but there is still a lot of smoke.
IBM Cloud: deploy a geo-referencing app
As in the example we started out with, if you are on your own and don’t have enough experience in all the areas needed to, say, launch your web app, then you should definitely look for something you can order to suit your needs and preferences, as we imagined in the fast-food restaurant.
Luckily enough, you can order an infrastructure online just like that. For instance, IBM Cloud offers great tools to help you reach your goal. You can have your Container clusters created in minutes, and without the need to do any maintenance. Or you could use Functions in Serverless logic or even a source-to-image solution, which takes the code from Git and automatically deploys the app in the cluster.
Let’s take the latter as our example.
First, you need your IBM Cloud Platform account. You can go to cloud.ibm.com to create your free account.
Then, thanks to Jan Kleinert’s post on the RedHat/OpenShift blog, we can deploy a geo-referencing app on OpenShift cluster on the IBM Cloud in just a few minutes. We can imagine that this simple application is the Node.js application that you have just completed writing.
This is a web app to show the different dog parks in Raleigh, North Carolina. The app uses React-Leaflet to handle the map features, so we need the capability to deploy a Node.js application.
This simple exercise is composed of two main steps:
- Create an Openshift cluster, with one worker node, totally managed by IBM Cloud Platform;
- Deploy your NODE.JS application using the Source to Image facility.
Phase 1 – Cluster creation
Creating a cluster container, and orchestrating your runtimes to be safe, robust, scalable, running on the internet and so, is usually quite a complex list of activities, like preparing hamburgers at home. A lot of tools, a lot of things to manage, a lot of skills.
With RedHat OpenShift on the IBM Cloud Platform it is an easy job.
- Go to your IBM Cloud Platform account
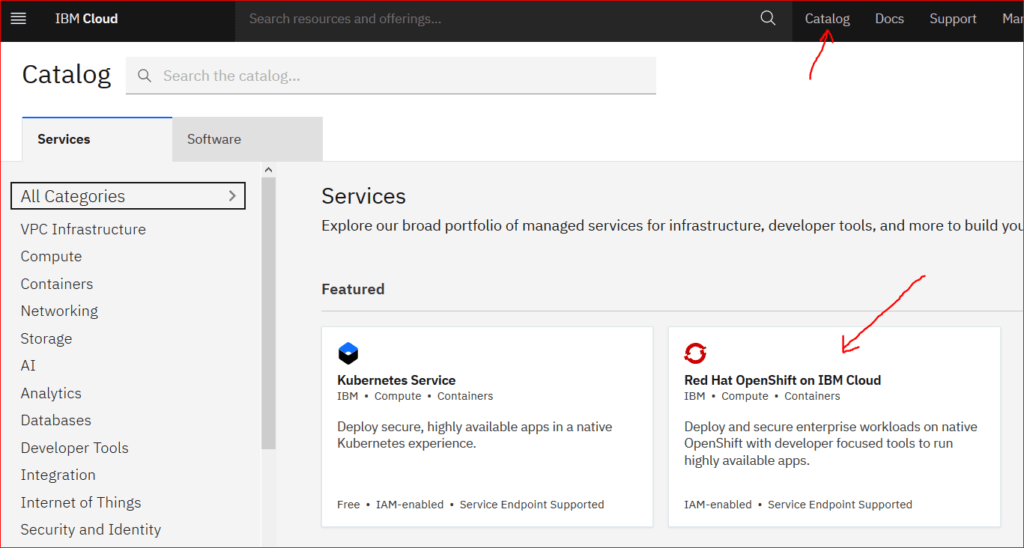
- Click on the CATALOG menu
- Click on the RedHat OpenShift box
- On the next page, select:
- Availability: Single Zone
- Geography: Europe
- Worker Zone: Milan01
- Flavor: 4vCPUs 16 GB Ram
- Worker nodes : 1
- Press CREATE and in 20 minutes your cluster is ready!
No headache, no smoke, no frustration. Now you have time to drink a good coffee, check your emails, and return twenty minutes later to your IBM Cloud account to visualize your Resource List (upper left menu with 4 little lines).
You are now ready to deploy your DogParks node.js-react application.
Phase 2 – Deployment with Source to Image
At this point, enter your cluster and proceed as follows:
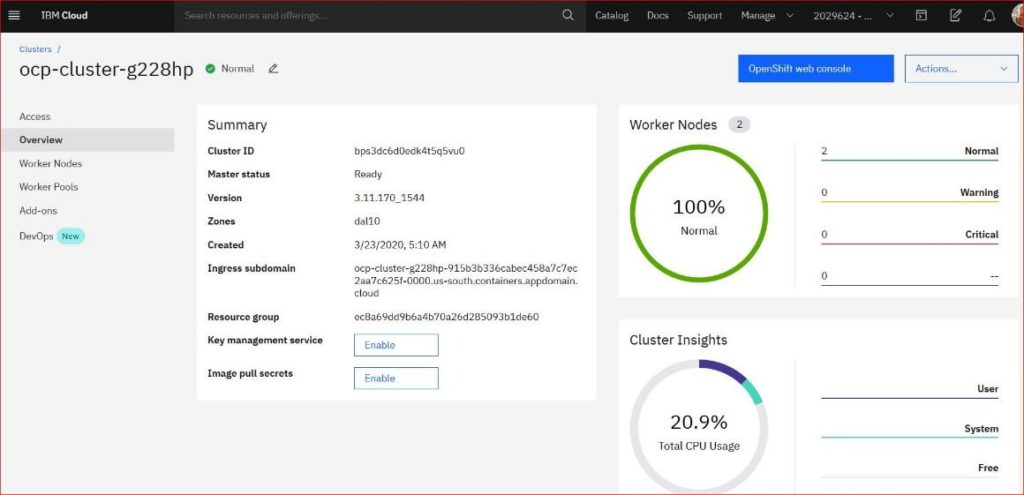
- On the Resource List, in the section Clusters, you will see your cluster. Click on it.

- The cluster dashboard will be shown, and you can click on the blue OpenShift web console box.
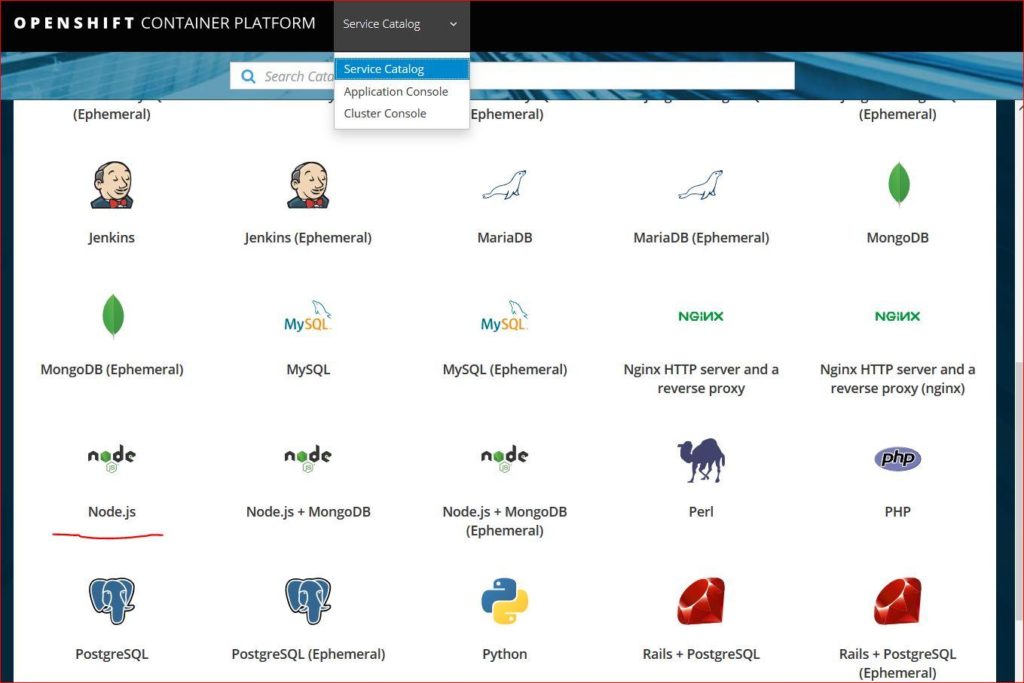
- In the Console, click on the Node.Js template:
- On the panel:
- Click on NEXT;
- In the field Add to Project select Default or write a name for a new project;
- In Application name write the name of your application (dogsinnc for example);
- In Git Repository, paste this URL: https://github.com/jankleinert/raleigh-dogparks.git
- Click on Create, then click on Close:
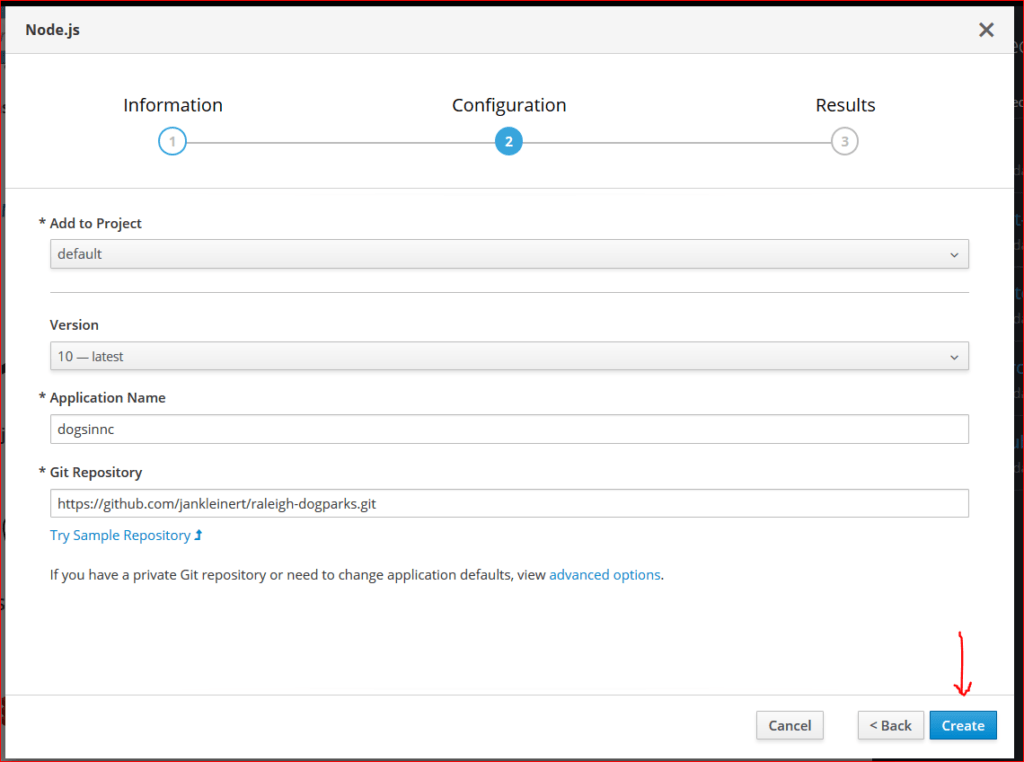
- On the upper menu, select Application Console and click on your project (default). You will see your application building:

One or two minutes later, the deployment will finish and you can use your application.
Phase 3 – Scale your application
Once the deployment is finished you will see your application pod with the app’s URL ready to be used:
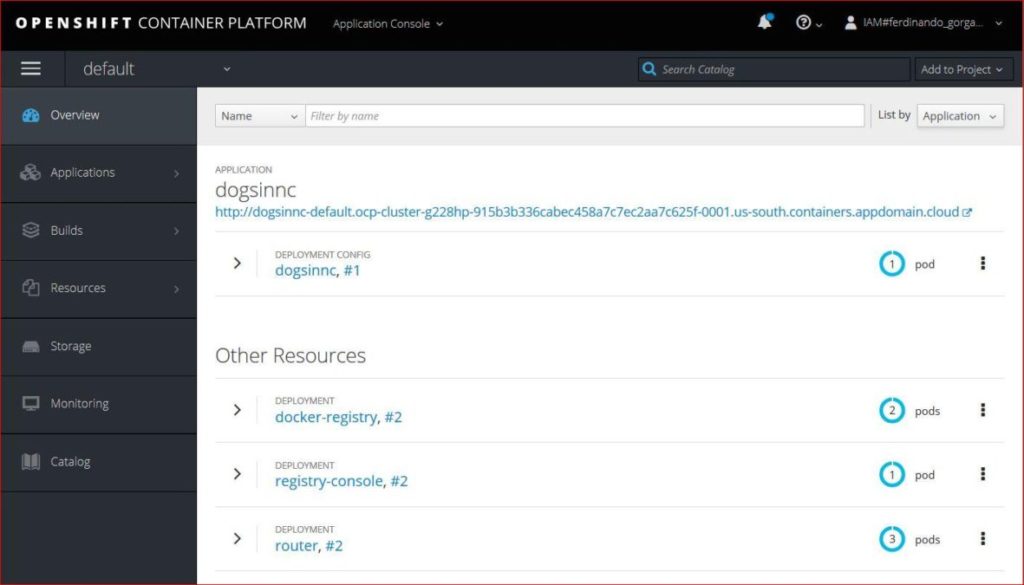
Now you can also scale your application. By clicking on the > icon you will open your application details. You can add the instances that you need to empower your application to all pods, by just clicking on the up-down arrows:
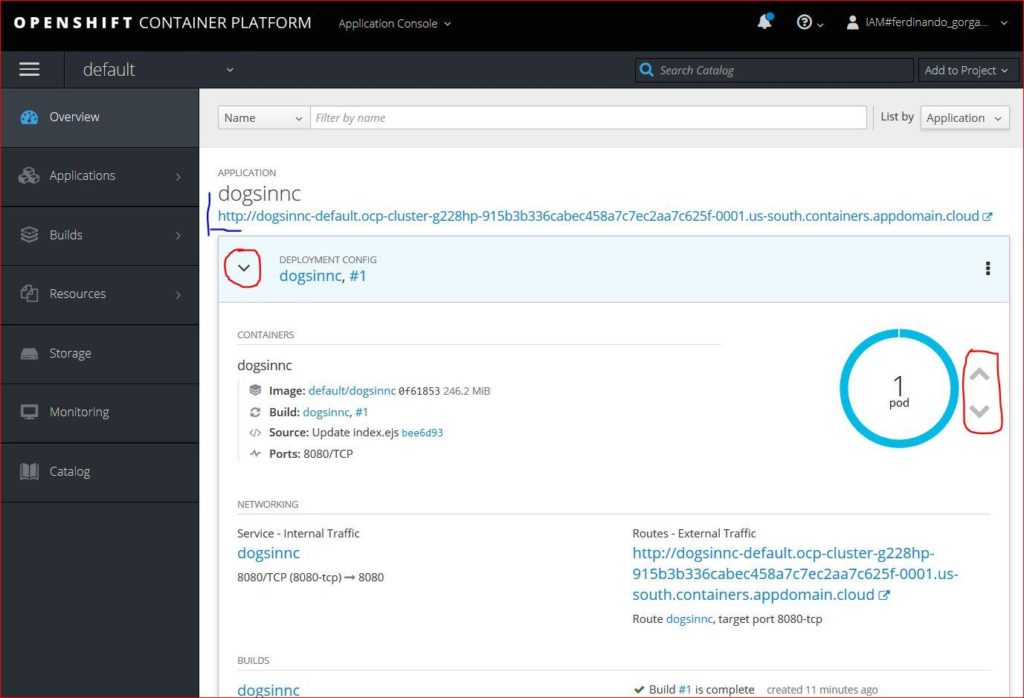
That’s it! You’ve successfully deployed the app on an orchestrated cluster container in few minutes.
Click on the app URL to use it:
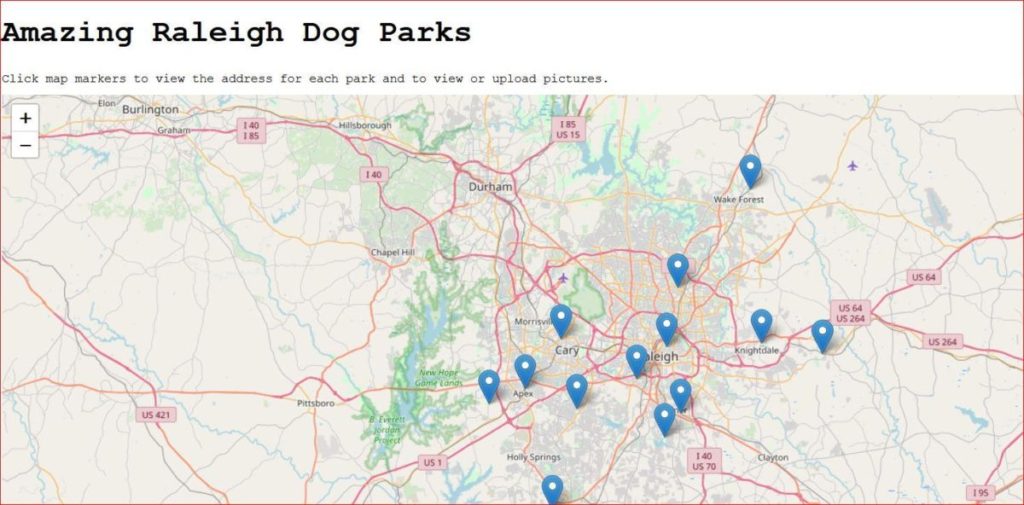
Thank you for all the code
As you’ll have realized by now, there are developers who can develop good code but have some difficulty in making it available to customers. There are specific solutions that can help us achieve that in a short time, thanks to infrastructures that can help any developer make their product immediately available to the final user.
When the two meet, innovation kicks in and any developer can move several steps forward in their career and in the services they can offer.
The distance between code and production has finally shrunk.


