This article written by Shay Shmeltzer, Director of Product Management at Oracle, was originally published on Oracle Developers Portal.
By this time you will probably have seen multiple blogs about the Fn Project – an open-source, multi-language, container-native serverless platform. You may already have heard that Oracle is going to offer a cloud-hosted Function as a Service (FaaS) for Fn-based functions called Oracle Functions – currently available with limited access (get your invite to try it out here).
So, how do you create an automated CI/CD chain for your Fn functions?
Oracle Developer Cloud Service now provides built-in functionality to support you.
DevCS supports Fn Project functions life cycle command definition in our CI/CD jobs. This means that you can automate Fn build and deploy steps in a declarative way. We also added support that enables levergaing the hosted FaaS offering in the cloud and CI/CD directly into that environment.
Here are the basic steps to get DevCS hooked up to your Fn-based FaaS service running in the Oracle Cloud Infrastructure.
Your build will have several steps, including:
Docker Login
This will let you connect to the hosted docker registry in the Oracle Cloud (OCIR)
Provide your OCIR url (phx.ocir.io, for example), your user ID(tenancy/username), and your auth token (N.B.this is not the password but rather the auth token you get from identity->user->auth tokens).
OCIcli Configuration
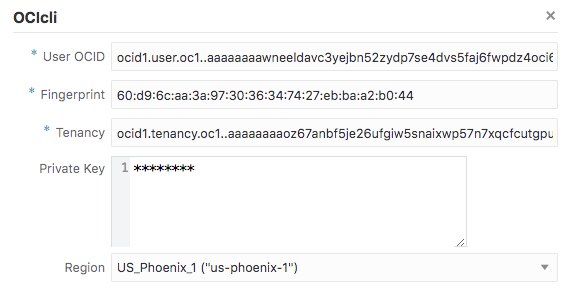
The next step is to configure access to your OCI environment by picking up the OCIcli build step. Then, provide information including your user’s OCID and Fingerprint, your tenancy OCID, your region, and paste in the private key that you generated.
OCI Fn Configuration
Now that your OCI connection is set, let’s add the specific configuration for your FaaS instance. From the Fn menu in DevCS pick up the Fn OCI option. Configure it with the details of the Fn environment you created, including the compartment ID, the provider (Oracle), and the passphrase you used when you created your private key.
Your environment is now ready to use the specific Fn lifecycle commands. We are going to assume that your Fn function code is in the root directory of the Git repository you hooked up to the build job.
Fn Build
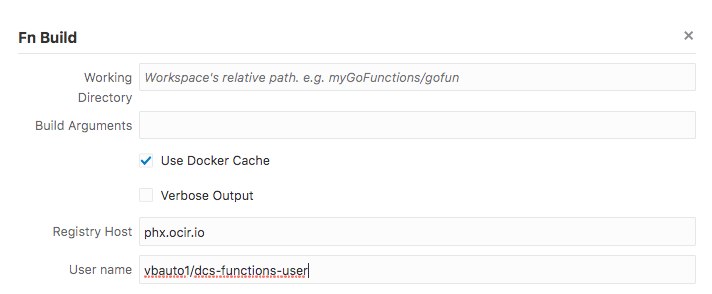
The first step will build the function for us. If the code is at the root of your Git, then you need only specify the Registry Host (phx.ocir.io) and the username (tenant/user). You may also choose to check the box to get verbose output from the build operation.
Fn Deploy
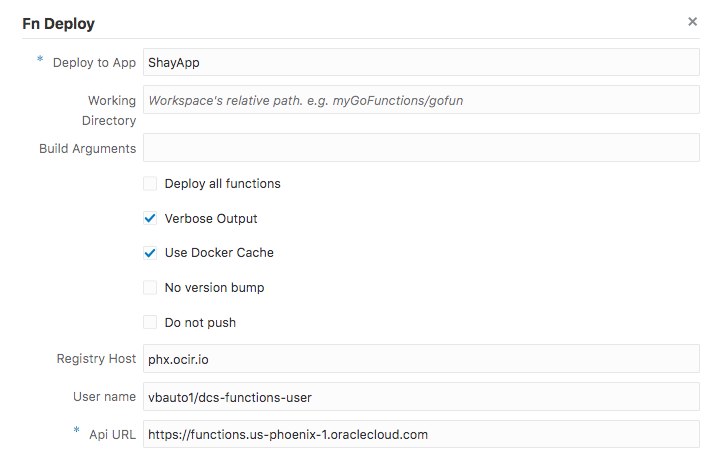
If the Build was successful the next step is to deploy it to our FaaS service. First, make sure you created an app in your FaaS function console. Use the name of that app to fill in the “Deploy to App” field. Fill out the Registry Host and Username field as in the previous step, and don’t forget to add the API URL (https://functions.us-phoenix-1.oraclecloud.com). You can then choose additional options such as verbose output, bumping the version of the app, etc.
Now run the Build and watch the magic take place.
Check out the video below to see it in action.

