Snap4City is the new platform for the sentient city. By using it you can get direct access to data from thousands of real sensors deployed on several cities, together with other types of resources such as static databases containing bus stops, wifi hotspots and many others.
Adding a custom sensor to the network for private or public use is a straightforward process. In this tutorial, we will go through the steps required to connect a raspberry Pi to the Snap4City network and send the readings of a temperature and humidity sensor.
An IOT application on the Snap4City platform will be used to output the real time sensor values to a public dashboard.
Before getting to it, let’s review the hardware we will need:
- A Raspberry Pi. A model 3B, 3B+ or Zero W is advised to get Wifi functionalities out of the box.
- A DHT11 or DHT22 temperature-humidity digital sensor.
- An SD card of 4Gb or bigger, an SD-card reader for your computer.
- An USB →micro USB-B cable, and a USB wall-wart (in other words a common cell-phone charger). They both have to be capable of delivering 2A.
- Some female jumper wires
- A monitor with HDMI input, and the HDMI cable
- Mouse and keyboard
Registering your device on snap4city
In order to add a custom device to the Snap4City, firstly we need to register it on the platform. To do so, you need an account with a permission level of Manager or higher. If you still don’t have an account, go ahead and create one by clicking on the new registration link on the home page.
Let’s proceed to the registration of a new device. After logging in, go to IOT directory and devices > My IOT devices > Add new device.
Give your device a name. In this tutorial I’ll call it codemotion_tutorial_sensor. Choose the location where it will be placed on the map. For the device model, choose Raspberry snap4city 1 – Certificate. Copy the device name and both keys and keep them for later use; you will need them to access to the data from your device – click on Submit device.
Go to My IOT devices: you will notice that snap4city have already created two sensor devices for you with temperature and humidity as value types. Click on the [+] button on any of them to see all its properties.
Go to My IOT devices: you will notice that snap4city have already created two sensor devices for you with temperature and humidity as value types. Click on the [+] button on any of them to see all its properties.

Img 1: Registered IOT devices.
Installing the software on your Raspberry
The Raspberry Pi is the best known Single Board Computer out there. These devices, often not much bigger than a credit card, are capable of running an entire operating system, and give you access to low and high level peripherals.
The steps described on this tutorial can be applied to any of these devices running linux.
To start using the raspberry, we have to give it an operating system to run. The process, often called flashing, is nothing more than an obsessive copy of every byte from a file (the operating system image) to the SD card. In order to do it, we need a special software that takes care of doing it the right way. A popular and easy to use option is balenaEtcher.
Download the Raspbian Stretch with desktop image from the Raspberry pi ‘s Raspbian downloads page and unzip it.
To flash your SD card, open balenaEtcher and just follow these simple steps:
- Select the Raspbian image you have just downloaded.Insert the SD card on the card reader and plug it into your computer.
- Select the SD card as the target drive.
- Flash!
- Wait a few minutes 🙂
Now the SD card is ready to provide your Raspberry with an operating system. Insert the card on the raspberry, plug in the HDMI monitor, mouse and keyboard.
Power the raspberry using the cell phone charger and let it boot. After a few seconds, you will see the Raspbian desktop environment. Since this is the first time you use this OS, you will be guided through a simple setup process where among other things you can choose the language to use and enter your WIFI credentials.
Now it’s time to install nodeRed, a Flow-based visual programming language that will allow us to easily create IOT applications. It is, by the way, the same language that you will use on the snap4city platform to create the application that will drive the public dashboard.
Open a terminal emulator window in Raspbian by clicking on the top-left terminal icon. If you are not familiar with the command line environment don’t worry, you just have to copy and paste the following command (You might be asked to enter your password). It will also take care of installing any dependencies for this tutorial and configuring your system.
bash <(curl -sL https://gitlab.com/daylanKifky/codemotion_snap4city_tutorial/raw/master/tut01_raspberry/install_s4c_deps.sh)
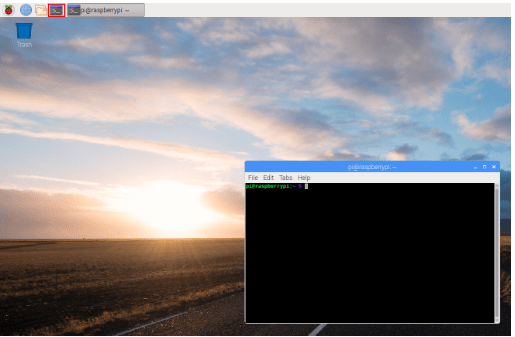
Img 2: Raspbian desktop environment with an open terminal emulator
The nodeRed GUI.
To create your IOT application, open a browser on the raspberry and visit http://localhost:1880. You will access the nodeRed graphical user interface (GUI) that looks like this.
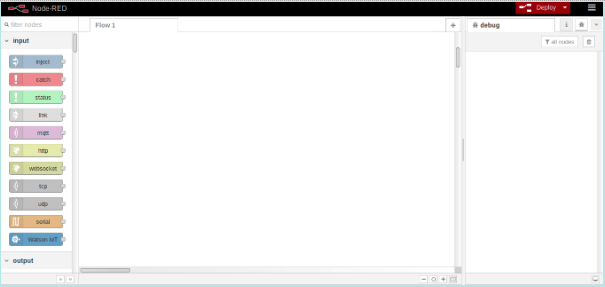
Img 3: The nodeRed Graphical User Interface as seen from a browser.
Hint:
In case you are wondering what’s happening: the nodeRed application runs a webserver. When you visit its address from a browser it serves you a webapp from which you can control the behaviour of the nodeRed application by wiring together some nodes and then deploying them.It can be accessed not only from within the raspberry pi, but also from any other computer that’s sharing the same LAN.
In fact the script we runned configures the nodeRed server to start on boot, so in the future you can just plug the raspberry without any monitor or keyboard, and just access the nodeRed interface by visiting http://<RASPBERRY IP>:1880 from your PCMoreover, in some computers you don’t even need to know the raspberry’s ip. Just visiting http://s4cdevice.local:1880 will do the trick. This works on most computers running mac or linux.
Your first nodeRed flow: connecting to the IOT broker.
It’s time for you to meet the “IOT brokers”, where a big portion of the magic behind snap4city happens. These are remote services that help ensure the communication between sensors, actuators, dashboards and other types of clients is stable and reliable. Within a broker, you typically create context elements that represent iot devices of some kind. A user can subscribe to one or many context element to get notifications when some condition occurs (typically when a value changes).
The brokers work under the NGSI RESTful API, but the best part is that you don’t need to know all these details to exchange information! Snap4city takes care of the heavy lifting for you.
Within the nodeRed environment on your raspberry, you will see a series of nodes on the left. On top of the nodes there’s a search bar: look for the fiware-orion-out node and drag it to the working area.
By double clicking that node, you will be able to edit the configuration details:
- Device type: Ambiental
- Device NameID: Key1: Key2: Service: add a new orion service
- URL: broker1.snap4city.org
- Port: 8080
- Name: orionUNIFI
You will also need some additional nodes: inject and function. Connect them like the image below

Img 4: NodeRed flow: sending random data to the IOT broker.
Edit the function node and paste the following lines:
msg.payload = {
"name" : "temperature",
"value" : Math.floor(Math.random()*100),
"type" : "float"
};msg.payload = JSON.stringify(msg.payload);return msg
The inject node is basically a way to trigger the action in some part of a flow by giving you a button on the GUI to do it. It actually does inject a value: by default it is the current timestamp, but we don’t really care about that value at the moment. At this point you might be starting to see where we are going, but let’s quickly review our node Flow:
- The function node is used to modify the flowing values with an arbitrary piece of javascript code. In this case, we are just dropping the incoming values and generating a specific type of json with some random values and putting it on msg.payload.
Let’s take a second to examine the json, in particular the “name” property which in this case is “temperature”. Do you recall seeing it before on this tutorial?
You are right! It was one of the value types of the sensor snap4city created for us when registering our device. This is the type of Json the fiware-orion-out node expects in order to send the values to the broker.
We can now deploy our application by clicking the button on the top-right. Once deployed, every time we click the button on the inject node we will upload a random value to the registered sensor on the broker.
Creating the Dashboard
The workflow on snap4city usually involves creating a dashboard, which is a public or private interactive page where a user can see or control one or many of the broker context elements in real time. A dashboard can be driven by one or more underlying IOT applications, and that’s what we are about to do now.
Login to the snap4city platform and click on My Dashboards in my Organization > New Dashboard. Give it a meaningful name (if you decide to make it public, this name will be seen by others), choose the empty dashboard template and click next. On the second screen click on the big Instantiation button to proceed.
We will manage the dashboard from an underlying IOT application, so let’s create one. Go to IOT applications > Create new. Give it a name and choose the type “basic”. You will see your recently created application on the list. By clicking it you will access to a familiar development environment: the nodeRed GUI, but this time it is running in the snap4city context.
Now it’s all set to start making our flow. We want to monitor the changes on the temperature value of our sensor. So place a fiware-orion-in, fill it with the same values we used before for the fiware-orion-out node.
The next node in the flow will be a function one with the following code:
let temp;
msg.payload[0].attributes.some(function(attr_obj){
if (attr_obj.name === "temperature"){
temp = attr_obj.value;
return true;
}
return false;
});
msg.payload = temp;
return msg;
Connect the output to two nodes:
- A debug one that will allow us to see the changes directly on the debug console, on the right side of the nodeRed GUI.
- A single-content node will create a widget on one of our dashboards. Once placed on the working area double-click it and choose the name of your dashboard from the dropdown menu. You can also click on the view dashboard button before confirming your editing to see the result on another tab.
The flow should look like:

Img: nodeRed flow: monitoring changes on the registered sensor values and displaying them on the dashboard.
Deploy your flow. You should now see a widget on your dashboard. Try going back to the flow on your raspberry and click the inject button; the widget will update to reflect the random value your raspberry sent!

Img: The dashboard displaying the real time values on the registered sensor.
Adding the sensors
Now everything is set add our DHT11 and get real temperature readings. Wire your raspberry and sensor like the scheme below:
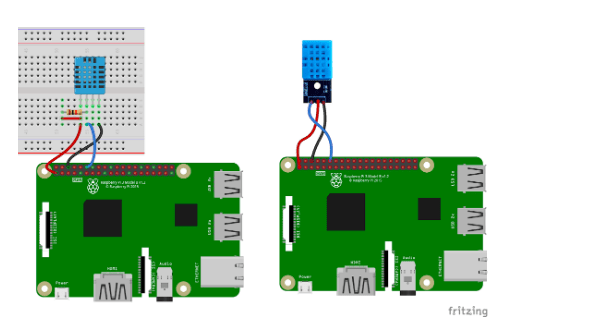
Img: Wiring the Raspberry pi with a DHT11/DHT22 sensor.
Notice that the DHT-22 and DHT-11 sensor might come with three or four exposed pins. If you have the four pins version, you will need to add a pull-up resistor between the data and power lines. Values between 4.7Kohms and 10Kohms will work.
Now we can modify our flow to make use of the sensor data. The library to work with this type of sensor was already installed with the initial script. In case you are doing a manual installation here’s more information.
Add a dht-sensor node. Edit it to use your model of sensor, set the pin numbering type as physical pins (rev.2), and the pin number to 12. Place the node between the inject and function nodes.
Edit the function node: modify the value assigned to the “name” property of the Json to use the incoming value instead of a random number, like this:
let temp_from_sensor = msg.payload;
msg.payload = {
"name" : "temperature",
"value" : temp_from_sensor,
"type" : "float"
};msg.payload = JSON.stringify(msg.payload);return msg;
We want to make periodic readings of the sensor, so modify the inject node to repeat the action on an interval of two seconds.

Img: nodeRed flow: reading the DHT11 sensor on periodic intervals and sending the data to the IOT broker.
Deploy the flow, and trigger the injection intervals by clicking on that node’s button. Test the sensor by putting it next to a warm object (the hot air coming out from your laptop is ideal for this task). Do you see the values changing on the debug console?
Now open your dashboard on the snap4city platform. The changes on the sensor readings should be reflected on the widget, no matter how far away both endpoints are.
Congratulations! You have created a basic example with a very powerful configuration, and now you can keep expanding and create amazingly complex application by just adding some nodes. For example, you can try using the humidity reading from the DHT-11 and exposing it on the dashboard. Or what about registering a new actuator device and making it turn on some lights when the temperature values reach certain thresholds? We are eager to see what you can create!
You can find the sources for this tutorial here
Snap4City Hack
Snap4City platforms and solutions are available at Snap4city.org website, where you can register and start exploring its features. But if you want to really challenge your skills and propose your innovative solutions for connected cities, you can join the upcoming Snap4City Hack, the big online hackathon on the topics of Smart City and IoT.
Snap4City launched a big online Hackathon on Ecological Watch, Social and Service Evolution, Stimulating Business Growth, City Aware.
Using Snap4City tools to manage IoT, Big Data and analytics, the hackathon challenges will cover different themes – Ecological Watch, Social and Service Evolution, Stimulating Business Growth, City Aware – and real data from cities such as Helsinki or Antwerp.
Further information on the Hackathon is available on the on Snap4City.org/hackathon website.

