Organised by Nimbella and promoted by several members of the Apache OpenWhisk community, FaaS Wars is a programming competition that allows participants to learn how to use ‘serverless’ in a fun way. Competitors strive against each other for cash prizes for creating the best serverless virtual robot.
The basic concept of the competition is simple: participants write code to manoeuvre a FaaSfighter robot across a field of combat, firing lasers at another competitor’s robot. To win, a robot must hit the enemy robot five times in a minute-long ‘battle’, and also avoid being hit by its opponent’s lasers.
Robots and Serverless APIs
Before you can begin your campaign, you need to first use Nimbella to build a serverless API with which to control your robot’s movements. An event describing the state of the game is received by the API, which responds by giving the FaaSfighter robot orders. The tutorial below explains how to build your fighter and offers battle strategies that gradually increase in ‘smartness’.
JavaScript is used to implement the API in the examples that follow. However, any other language that is compatible with Nimbella can be used, such as Python and Go.
A ‘Nimbella action’ is the name given to an API that is implemented on a serverless basis. A JSON object that encodes the state of the game (“the event”) is sent as input to the action. The output returned – the ‘orders’ – is in JSON as well. The below examples can easily be translated into your chosen language.
Meet your Serverless Robot
The built-in editor in FaaS Wars is used to write the code that will control your robot. Your code operates as a function with this format:

The return needs to be a JSON dictionary with the property body that contains an array of orders destined for your fighter (more details follow). At this stage, the robot is not yet mobile but sits still, vulnerable to the lurking opposition.
Taking Command of Your FaaSfighter
The following function sends the robot a single order at each point in the game, producing an array that incorporates the instruction to “yell” the relevant instruction or information while in battle. This particular example communicates the time at which the order is given.

Adopting this action as your first battle strategy will result in your robot being a great timekeeper until a robot with more useful skills destroys it, or the battle time runs out. It’s always great to know what time it is, but it’s not the most effective of battle strategies. Nonetheless, your robot is now active, even if all it can do is tell the time!
Getting your Serverless Robot moving
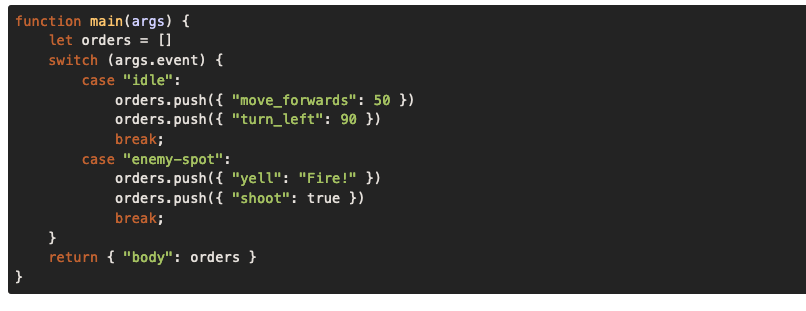
The next step is to get your robot moving on the battlefield. As discussed above, an array of commands is returned by the action, so a single function execution allows you to give several orders. This action tells the robot to move forward before turning to the left:

Running this code results in the robot moving around in a square as it repeatedly follows the instruction to move forward 50 pixels before turning 90 degrees to the left. If another player hits the robot, it may be forced off course and take a new, random orientation.
Events and Reactions
Throughout the game, the robot is continuously receiving information about its environment from the args parameter. At the top of your list of things to check should be args.event
Your robot can react to four different event types:
idle: the robot is inactive because it has run out of commandsenemy-spot: the enemy has been sighted directly in front of the robot’s laser turret.hit: an enemy laser has hit the robot.wall-collide: the robot cannot move forward as it has collided with a wall.
The next essential ability is the capacity to ‘shoot’ at opponents. A switch added to the event serves this purpose. An array is again used to collate the orders for execution. The code now looks like this:

This function returns an array of orders. Each of these orders operates in the manner of a map, for which the key is a command to execute.
Two different order types exist. Movement orders execute sequentially, i.e., your robot must take one action at a time – it cannot move right and left simultaneously, or make a turn and move forward at the same time .
The movement orders available are:
move_forwards <number>: move forward the number of pixels specified;move_backwards <number>: move back the specified number of pixels;move_opposite <number>: move the opposite way (helpful when you reach a wall!);turn_left <degrees>: turn the specified number of degrees to the left;turn_right <degrees>: turn right by the number of degrees specified.
Attack orders on the other hand, execute concurrently. Your robot can yell and shoot simultaneously, and the turret can also be moved.
The attack orders are:
yell <message>: display a message;shot: true: an order to shoot when the value is true;turn_turret_left <degrees>: rotate the turret to the left by a specified number of degrees;turn_turret_right <degrees>: rotate the turret to the right by the number of degrees specified;data: <object>: store the object for future events.
Improve your Fighter
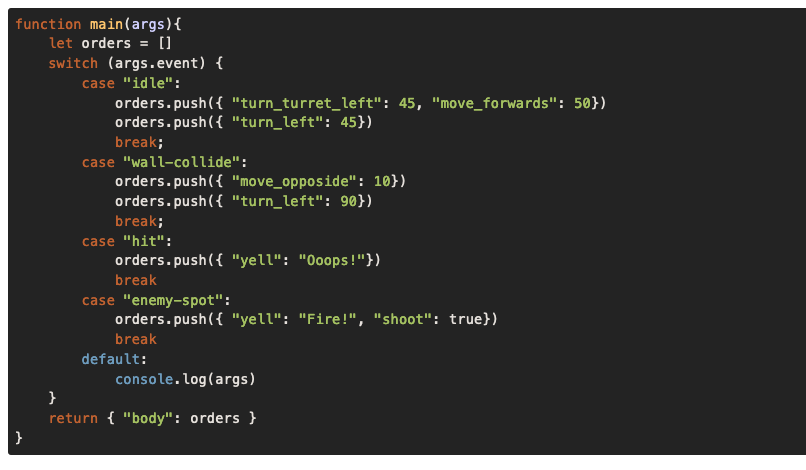
Now you are ready to see your robot in action, and to deal with situations in which the robot collides with a wall or is shot by the enemy. When a new robot is created, a default fighter is established using this control program:

Make your Serverless Robot Stateful
Up to this point, you’ve created a simple robot that follows a square pattern and fires when the enemy is seen. Give the robot a better chance of winning by using the robot’s ability to ‘remember’ the current state of play, and to consider information about its environment, to make it a bit smarter.
In the examples below, we use the following skeleton for the action. You will replace the place holder // insert here with code snippets we will introduce later.

The input event
As you have already seen, your serverless API receives the function parameter, called args in the examples, as the event. Information about the game, your robot’s position and that of its opponent are all included in this event, with the schema as follows:

The event specifies the Faasfighter’s position (x and y), how many attacks are possible before the robot is defeated (energy), the angles of the tank (tank_angle) and the turret (turret_angle), and the total angle – in effect, your laser beam’s angle.
Once your robot can see its opponent, more details can be found in the enemy_spot object. This, and other information about the state of the game, can be held in data, but learning how to look for the enemy comes first. One easy option is simply to turn the turret a full 360 degree circle, using the code:

By beginning the battle, enabling Debug and clicking on Trace repeatedly, the event enemy-spot (the turret is aligned with the enemy) will eventually become obvious
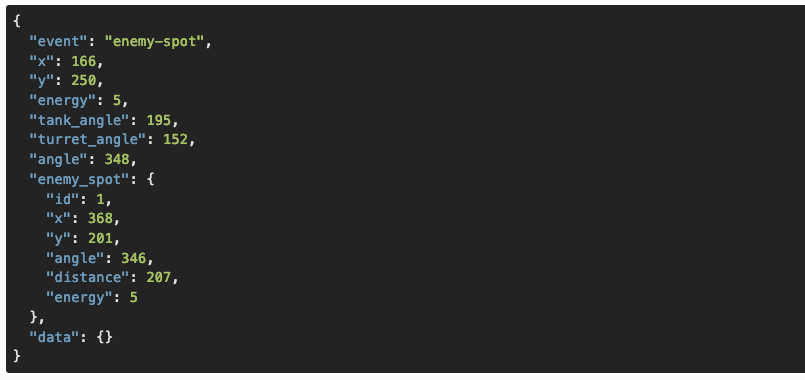
Here is an example enemy-spot object:

Making use of saved History
In the example above, you’ll see that the opponent has been sighted at a distance of 207 pixels and an angle of 346 degrees, but now what? It might be useful to remember the enemy’s last known location, so we can aim the turret accordingly. To do that, we need to save the angle. This can be achieved using the data command:

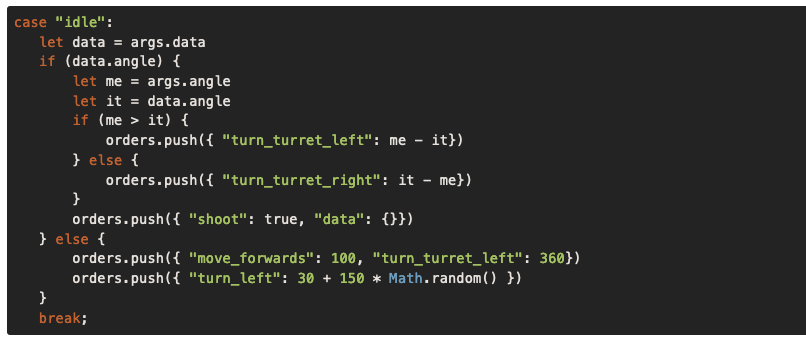
The robot is now building a store of information; this allows us to align the turret with the enemy robot and take aim. When your angle is greater than that of the enemy, it’s usually best to rotate the turret to the left. If not, rotate to the right, and fire when alignment with the enemy has been achieved.
Once a shot has been fired, the angle we saved earlier is no longer relevant until the enemy has been spotted again. It’s also wise to move while the robot is idle – no point in giving the enemy an easy target – while continuing to rotate the turret to spot your opponent. In code, this looks like:

A few final refinements for our Serverless Robot
You now have a good robot, but it’s still vulnerable if it collides with a wall and gets stuck, so some adaptation is necessary. In this case, the solution involves moving in the opposite direction and then turning 90 degrees to the right.

If the robot takes a hit, moving away is a good idea – you don’t want your robot to be hit repeatedly. One option for evasive action is to move by a random amount, in this case backwards, to get away from enemy fire safely:

In Conclusion…
The fundamentals of the game and how you can control your FaaSfighter – move, spot the enemy, persist state, aim and fire – are now clear. What comes next is up to you! What might a successful strategy look like? How good are you at judging the location and travel speed of your opponent? Are you able to predict and outmanoeuvre its actions? Are there other evasive actions that will get you out of the line of fire faster and more efficiently?
The opportunities for fun are unlimited and we hope you will enjoy competing while you learn about serverless programming. The FAAS WARS are just beginning; good luck, and may yours be the victorious FaaSfighter!


